Monday, December 23, 2013

Merry Christmas and Happy New Year Everyone.

I want to wish everyone a Merry Christmas and a Happy Healthy New Year.  I also would like to thank you all for leaving your comments and for following along with me on this creative journey. I'm looking forward to sharing new projects and exciting news coming to Kitt's World in 2014. 
God Bless
Kitt.
 
I entered this card in the following challenges:


Tuesday, December 17, 2013

Thinking of you this holiday season

Hello my crafty friends,
Here is another holiday card. This is for our challenge over at {Pin}spirational Challenges  Be sure to take a look and see what our talented design team has to inspire you. Join the challenge for a chance to win some images from our sponsors The Stamping Boutique and Fresh Brewed Designs As some of you who may follow me know, I lost my mom a couple of months ago.  This will be our first Christmas without her. Although I will talk to my sister who is out of state, I will send her this card too. The image is from The Stamping Boutique. The base card was embossed with the Cuttlebug baby breath embossing folder. The sentiment was computer generated and the mats were cut with Spellbinders A2 Base card die set.  Where would I be without my Spectrum Noir markers. LOL.  Here is what I used: Window Frame GB1, Window panes BT1, Bear TN7, Bows DR3, Table JG1, CT4, Face FS1,2,8,5,PP4. Hair CT1,3,4, Wall GB2, Floor EB1. I used Stickles Diamond around the edge of the yellow table trim, girls bodice and frames of the image and sentiment mat. I had some left over Martha Stewart Pine Leaf punches from a previous project and embellished the mat.  Follow me along as I will have a few more holiday cards posted soon. Thanks for stopping by today and leaving your comments, I enjoy reading them.
I entered this card in the following challenges:
2 Creative Chicks Christmas/Winter UE
A Creative Romance Sparkle at Christmas 3E #2
A Gem of a Challenge Anything Goes UE
All That Stickles Happy Holidays
Card and Scrap Christmas Anything Goes UE
Card Crafter's Circle Celebrations 3E #2
Card Makin' Mamas Merry Christmas 2E #1
Cards Galore Christmas UE 1E/day
Challenges 4 Everybody Anything Goes UE
Country View Craft Bah, Humbug / Christmas UE
Craft Mojo Christmas UE
Craftin' Desert Divas Christmas UE
Crafting from the Heart Anything Goes 3E #1
Crafts and Me Anything Goes UE
Crafty Hands Season's Greetings/Winter 3E #2
Creative Fingers Anything Goes Optional Easel 3E #1
Creative Inspirations Paint Inspired by:  Merry Christmas UE
DL.ART December Linky Challenge UE
DRS Designs Glitter it Up UE
Great Impressions Glitter and/or Sequens 3E #1
Hanna and Friends Christmas UE
Just be Creative Crazy December Linky Party UE 1/day
Loves Rubberstamps Anything Goes UE
Melonheadz Friends Christmas 2E  #1
My Craft Creations Anything Goes UE
My Mum's Craft Shop Winter/Christmas 3E #1
Paper Crafting Journey It's Christmas Time UE
Paper Pretties It's Beginning to Look a Lot Like Christmas UE
Pin and Tack Anything Goes with Animals 5E #4
Polkadoodles Digi Choosday Christmas Cheer UE
Quick Quotes Holiday Card 1E
Scrapping 4 Fun Anything Goes 1E
Sister Act (Cards Only) Anything Goes UE
Sparkle N Sprinkle Anything Goes with Glitter, Embossing Powder, and/or Flocking UE
Stamp and Create Anything Goes 4E 1/wk #2
Stamping Sensations Free and Easy 3E #1
Chocolate Coffee and Cards: http://chocolatecoffeecards.blogspot.com/


Monday, December 16, 2013

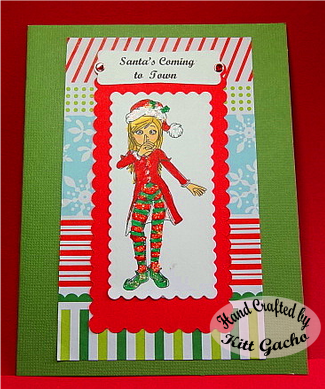
Santa's Coming to Town

Hello my crafty friends,
Only 10 more days to Christmas.  Are you ready for Santa? Here is the last challenge for 2013 over at Artistic Inspirations  The image is from  Stitchy Bear Stamps. I used Spectrum Noir markers DR4,JG1,GB2,GB8,TN2,PP3 and Stickles Diamonds glitter glue for the sparkle.  I used Recollection Seasonal paper collection for the mat background and computer generated the sentiment which I punched out with a stampin up tag punch. I also added Starform glitter sticker dots to the tag. Why not take a break from all the holiday madness and grab your favorite beverage and stop over and see what the talented design team has come up with for your enjoyment.   Be sure to stop over and see what the talented design team has come up with for your holiday cards..   There will be surprises and more coming to Kitt's World starting in January.  So don't miss out on the fun and follow my blog so you don't miss anything. Thanks for leaving your comments, I love hearing from you. Wishing you all a very Merry Christmas and a Happy New Year. See you next year.
 Hugs,
 Kitt
 

I entered this card in the following challenges:
Delightful Challenges: http://delightfulsketches.blogspot.ca/
Digi Stamps 4 Joy: http://digistamps4joy-sa.blogspot.ca/
613 Avenue Create: http://avenue613.blogspot.ca/
Challenges 4 Everybody: http://challenges4everybody.blogspot.ca/
Chocolate Coffee and Cards: http://chocolatecoffeecards.blogspot.ca/
Creative Inspiration Paint: http://www.creativeinspirationspaint.com/
Welcome to Ruby's Rainbow: http://rubysrainbow.blogspot.ca/
Stempelsonne Challenges: http://stempelsonne.blogspot.ca/ 
 

Sunday, December 15, 2013

Magical Time of Year.

Hello my crafty friends,
Today's card was an extra last minute creation for the challenge over at Artistic Inspirations. The image was so cute I had to create a card.  I used Spectrum Noir markers IB2,3,TB1,FS1,8 CT1,3  ENABLER ALERT: Spectrum Noir markers ON SALE for $4.97 at Consumer Crafts .See my post HERE regarding which set I would buy first. The base card is blue from my stash and the glitter mat paper is Colorboc from Walmart.  I would not recommend using it to cut on your cutting machine mats  unless you don't mind the glitter going everywhere. I used a corner punch to round out the edges of the glitter mat. The sentiment was computer generated and the mat was cut with Spellbinder A size die set.  The image was also cut with Spellbinders mat die set. I use Memento summer sky ink to edge both mats and lightly went over the snowflake background.  I used Darice snowflake boarder embossing folder on the white background and added a Starform silver glitter sticker to the elf's hand.  I used Stickles Diamonds glitter glue for the elf's earring, shoe, collar, belt and eye shadow.  Take a look over at Artistic for some last minute holiday inspiration and the last challenge for this year.  Thank you all for leaving comments and following me on this creative journey this year.  I'm excited to show you what I have planned for Kitt's World in 2014. I invite you to follow me on this creative journey. I'm wishing you all a very  Merry Christmas and Happy New Year.  See you next year.
Kitt

I entered this card in the following challenges:
613 Avenue Create: http://avenue613.blogspot.ca/
Challenges 4 Everybody: http://challenges4everybody.blogspot.ca/
Chocolate Coffee and Cards: http://chocolatecoffeecards.blogspot.ca/
Creative Inspiration Paint: http://www.creativeinspirationspaint.com/
Welcome to Ruby's Rainbow: http://rubysrainbow.blogspot.ca/
Stempelsonne Challenges: http://stempelsonne.blogspot.ca/ 
Crafty Hands Challenges: http://craftyhandsdevon.blogspot.co.uk/


Friday, December 13, 2013

Snowman Tag

Hello my crafty friends.
Can you believe it. I didn't use any Spectrum Noir markers or Stickles on this tag? Me either, LOL.  I used Crayola color pencils and a silver glitter gel pen and sparkle paper for the tag and poinsettia. I also used the Darice snowflake embossing folder and red Starfoam stickers for the poinsettia. I cut the tag, poinsettia and snowman out with the Silhouette Cameo. Snowy Sky background is a free digital paper from Spyders Corner. The snowman image is from Digi Darla Designs. The red and sparkle background paper was from my stash.  The sparkle paper was a heavy weight. I had to change my Silhouette blade to 7 and set to cover cardstock to cut it. This is only the second time I had to change my material setting.  Look here to see what I've done with transparency film in creating stencils. Take a look over at Craftitude Challenges to see what the design team created to inspire you to get those holiday cards done if you haven't finished them yet.  Enter the challenge to win fabulous images from our sponsors Digi Darla Designs and Sassy Studio Designs. Follow me along to see what new creations I have in store to share with you in 2014. Thanks for your comments. Happy Crafting.
I enter this card in the following challenges:


Thursday, December 12, 2013

ENABLER ALERT: SPECTRUM NOIR MARKERS TODAY ONLY FOR LESS THAN A DOLLAR

Hello my crafty friends.
I was surfing the web today and you know how I'm always saying how I love my Spectrum Noir Markers.

Today is your chance to try them at an incredible price you get a set of 6 for only $4.97 over at Consumer Crafts . Spectum Noir markers is coming out with new markers that will have brush nibs available to replace the chisel nib.  Unfortunately, the brush nibs won't fit the older model markers.. Which is why these markers are on sale. I have been using these older markers (I only got them last April)  and I can't see upgrading them for a brush nib. They are also refillable and I have bought a few of the refill bottles at   Scrapbook Warehouse . The blender refill was one of the first one's I bought.  As for which sets I would get first. are the essentials, because it does have the blender marker included. And I also would get the Pale essentials that includes the skin colors. Please leave a comment and let me know if you would be interested in learning more about Spectrum Noir Markers. Join me by following me into the New Year. There will new and exciting things coming to my blog. 

Monday, December 9, 2013

A New Challenge and Design Team

Hello my crafty friends,
I'm happy to announce I am on the Artistic Inspirations Challenges design team.  Officially I don't start until next month. But they gave me the option to join in this month. The theme for the challenge was your favorite color.  My color is pink, as you can tell from my card. The image is from Robyn's Fetish.  I used Spectrum Noir markers PP2,3,4,6. BP1,2,4,TN3,7, LG3,5,JG1 and Stickles diamonds for sparkle. The background paper is from my stash. Be sure to follow me as there will be some new and exciting things happening here on my blog at the beginning of the new year. Thanks for stopping by today and leaving your comments. I love reading them.
I entered this card in the following challenges:
Color Me Creative:  http://scrapbitzcopics.ning.com/


Tuesday, December 3, 2013

Naughty or Nice

Hello my crafty friends,
Today's card is a center step card and the image is from Sassy Studio. I used the Silhouette Cameo to cut the image and mounted it on pop dots and used a Zig two way pen to adhere the pine leaves.  The base step card is red. It was also cut with the Silhouette Cameo.  The white mat was embossed with Cuttlebug Baby Breath folder. The holly leaf mats are from Recollection Seasonal Paper pack.   I used the Martha Stewart pine leaf punch and Stickles Diamonds to highlight the white trim of her outfit. The sentiments are digital images. This card is for the challenge over at {pin}spirational challenge. Be sure to stop over and see what the talented design team has come up with for your holiday cards.. Join in the challenge for a chance to win 4 fabulous images from Sassy Studio. Our other sponsor for this month is Scribble and Scrap and they have some cute sentiment stamps for the holidays. Thanks for stopping by today and leaving your kind comments. You are welcome to come follow me on this creative journey I would love to share what I learn with all of you.

I entered this card in the following challenges:
All Sorts: Christmas Song inspired. My choice Santa Clause is coming to Town. http://allsortschallenge.blogspot.com/
Inspirational Challenges:http://inkspirationalchallenges.blogspot.co.uk/
4 Krafty Girlz Challenges: http://4kraftygirlzchallenges.blogspot.ca/
QKR Stampede Challenges: http://qkrstampede.blogspot.ca/
Through the Craftroom Door: http://ttcrd.blogspot.ca/
Add a little Dazzle: http://www.addalittledazzle.com/


Sunday, December 1, 2013

Silhouette Stencil Project

Hello my crafty friends,
Have I told you how much I love my Silhouette Cameo lately? LOL.  I'm still a newbie using it.  My husband wanted a way to personalize the golf balls. He said that the guys need a better way of identifying the golf balls.  He wanted to get a little gift for the guys he plays golf with.  He said the guys each like a different brand of golf ball and when he looked online he found that you didn't get a choice of brand and it was very expensive to personalize them. He said they have golf ball markers but he was looking for something more personable. It would have to be small enough to fit on a golf ball and portable to throw in the golf bag.  I told him I had an idea that I could create a personalized stencil out of transparency film. (overhead projector sheets).  He liked the idea and said he wants at least 5 stencils per name and could I save it so when they loose them I can make more.  I know I had transparency film but I couldn't find it. So off we went to Office Depot.  And talk about sticker shock. For a box of 50 transparency sheets was $39.99.  I only needed a couple of sheets, as I didn't even know how if my idea would work.  I spoke to a sales lady and she said that if  I only needed a couple of sheets I could buy it from their copying department.  That was a great TIP.  It cost 5 cents a sheet. I bought 10 sheets. LOL.  Well this was my first time cutting a different material other than cardstock with my Silhouette and it didn't disappoint me. Love my Silhouette Cameo. Oh, I already said that. LOL. In looking through the cutting material list I didn't see one transparency film. So, I figured this was going to be a trial and error and glad I bought 10 sheets.  I have the designer edition and chose the clear sticker paper.  It cut like butter. The stencils peeled right out with no need for weeding the letters out.
 
 
I must say that cleaning off the mat was a job with all the little letters sticking to it besides being hard to see. I put the cutting mat over color paper to help with that.  The labels were cut at 2.75Wx0.625H. The names were cut 1.500W x 0.390H. Some adjustments were needed such as, to be smaller due to the fact there were more letters.
 
After they were cut out came the real test. The golf ball which has a bumpy surface. My husband bought chisel tip sharpie markers to go with the stencils.  It didn't work out well. Of course I had to try my Spectrum Noir markers.  Again, it didn't work well.  I had one more type of marker in my arsenal to try.  My LePlume marker has a brush nip. It worked like a charm.  If my husband wants to give them markers (I had them for years), I could part with a few old ones and get some new ones to replace them. LOL. See pix  below for results of chisel, bullet and brush marker

 I have the memory makers envelop punch board and decided I need to play with that since I haven't used it since I got it last June.  I made the stencils but they were really lost in the smallest envelop I had on hand.  Since my husband wants to give these as stocking stuffers I used the gift card size measurements on the board. I wanted to dress it up a bit and used the Darice big dots embossing folder and ran through the Big Shot. I used white cardstock, it reminds me of the dimples on the golf ball.

  I wanted the envelop to be able to close again after they open it. I cut a slit to tuck the flap back in. I  the other envelops in different colors and use  a different embossing folders. My husband just called from the golf course and ask if he can add two more names for stencils. That makes 18 names. Follow me along on this creative journey and I will visit you too. Stay tune for more creative discovery's coming soon. Thanks for your comments. I love reading them.